How to Use a Flex Sensor – Arduino Tutorial
In this tutorial you will learn how to use a flex sensor with Arduino.
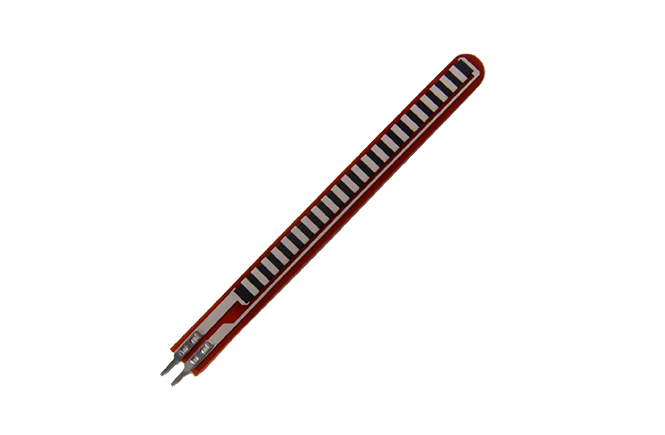
A flex sensor uses carbon on a strip of plastic to act like a variable resistor. The resistance changes by flexing the component.
The sensor bends in one direction, the more it bends, the higher the resistance gets.
In this example we will use a flex sensor to fade an led.
Components :

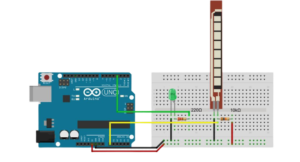
- Arduino uno
- Breadboard
- Flex Sensor
- Led
- 10KOhm & 220 Ohm resistors
Connections:
Example Code:
const int ledPin = 3; //pin 3 has PWM funtion
const int flexPin = A0; //pin A0 to read analog input

int value; //save analog value

void setup(){

    pinMode(ledPin, OUTPUT); //Set pin 3 as 'output'
    Serial.begin(9600); //Begin serial communication

}

void loop(){

    value = analogRead(flexPin); //Read and save analog value from potentiometer
    Serial.println(value); //Print value
    value = map(value, 700, 900, 0, 255);//Map value 0-1023 to 0-255 (PWM)
    analogWrite(ledPin, value); //Send PWM value to led
    delay(100); //Small delay

}
A flex sensor has a range from about ~10K to ~35K, that means it won’t give us a full 0-5 volt range (or 0-1023 analog value). Try to use the serial monitor below to find out what analog value you will take while you bending the sensor. It supposed to be between 700 to 900.
How it works:
value = analogRead(flexPin);
Read analog value from flex sensor
value = map(value, 700, 900, 0, 255);
Map analog values 700-900 to pwm values 0-255.
analogWrite(ledPin, value);
Send pwm value to led
You can make your own modifications to the code, for example, you can change “700-900” values in map function.
Leave a Comment
(0 Comments)