Arduino Traffic Light Controller Project Tutorial
The Arduino traffic light is a fun little project that you can build in under an hour. Here’s how to build your own using an Arduino, and how to change the circuit for an advanced variation.
Components :
- 6 x 220-ohm resistors
- A breadboard
- Connecting wires
- Red, yellow and green LEDs
Almost any Arduino will work for this project, providing it has enough pins.
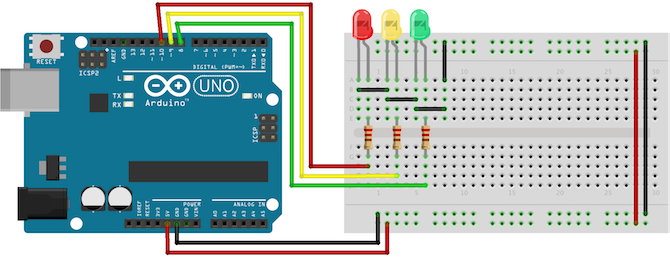
Connections:
Example Code
int red = 10;
int yellow = 9;
int green = 8;
void setup(){
	pinMode(red, OUTPUT);
	pinMode(yellow, OUTPUT);
	pinMode(green, OUTPUT);
}
void loop(){
	// green off, yellow off,red on for 3 seconds
	digitalWrite(red, HIGH);
	digitalWrite(green, LOW);
	digitalWrite(yellow, LOW);
	delay(3000);

	// red off, green off,yellow on for 3 seconds
	digitalWrite(red, LOW);
	digitalWrite(green, LOW);
	digitalWrite(yellow, HIGH);
	delay(3000);

	// red off, yellow off,green on for 3 seconds
	digitalWrite(yellow, LOW);
	digitalWrite(green, HIGH);
	digitalWrite(red, LOW);
	delay(5000);
}
Upload the code into your Arduino.
Leave a Comment
(0 Comments)