BASIC Programming On An Arduino
What is Arduino?
Arduino is an open-source electronics platform based on easy-to-use hardware and software. Arduino boards are able to read inputs – light on a sensor, a finger on a button, or a Twitter message – and turn it into an output – activating a motor, turning on an LED, publishing something online. You can tell your board what to do by sending a set of instructions to the microcontroller on the board.
Why Arduino?
Thanks to its simple and accessible user experience, Arduino has been used in thousands of different projects and applications. The Arduino software is easy-to-use for beginners, yet flexible enough for advanced users. It runs on Mac, Windows, and Linux. Teachers and students use it to build low cost scientific instruments, to prove chemistry and physics principles, or to get started with programming and robotics. Designers and architects build interactive prototypes, musicians and artists use it for installations and to experiment with new musical instruments.
What is Arduino IDE?
The Arduino Integrated Development Environment – or Arduino Software (IDE) – contains a text editor for writing code, a message area, a text console, a toolbar with buttons for common functions and a series of menus. It connects to the Arduino and Genuino hardware to upload programs and communicate with them.
IDE download link : https://www.arduino.cc/en/Main/Donate
Installing and Basic coding
Download the IDE from given link and install.If you are not properly installed then see the given video.
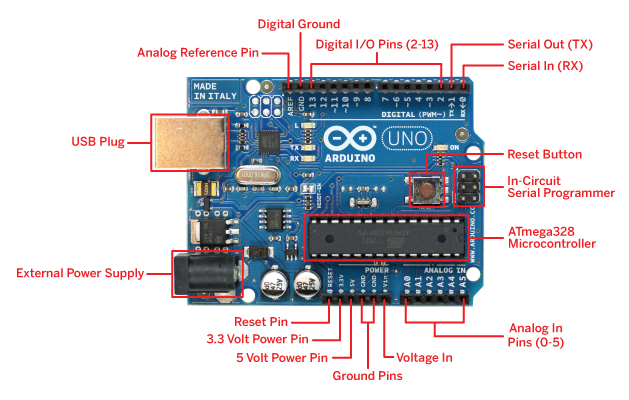
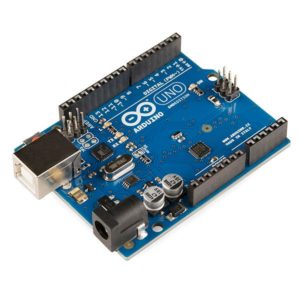
Before starting work with Arduino, we need an Arduino board.
There are many kinds of Arduino boards, namely, Arduino Uno, Arduino Mega, Arduino Nano, Arduino Due, Arduino Fio etc. But I guess, Arduino Uno is the best board for learning the basics.
After completing the installation process, when we well open the Arduino, it will look something like the bellow photo.
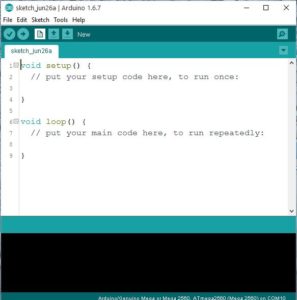
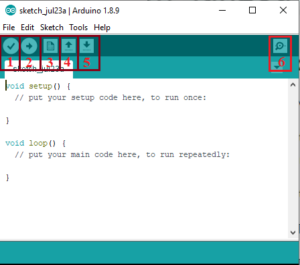
Now let us know about the different parts of the Arduino IDE.
1: It’s the button for verifying your written code you are
going to upload in the Arduino Board.
2: It’s the button for uploading your code in the Arduino Board.
3: This is for opening a new unit.
4: This is for opening your previous codes.
5: This is for saving your code.
6: It’s the button to open Serial monitor.
Now our target is to selecting the Board and port:
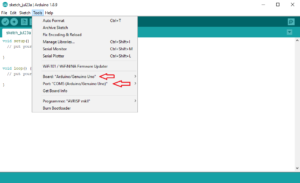
Board: Select the board which Arduino board you have.
Port: Select the port where your Arduino board are connected to the computer.
void setup() {
  // put your setup code here, to run once:

}
The setup() function is called when a sketch starts. Use it to initialize variables, pin modes, start using libraries, etc. The setup() function will only run once, after each powerup or reset of the Arduino board.
void loop() {
  // put your main code here, to run repeatedly:

}
loop() After creating a setup() function, which initializes and sets the initial values, the loop() function does precisely what its name suggests, and loops consecutively, allowing your program to change and respond. Use it to actively control the Arduino board.
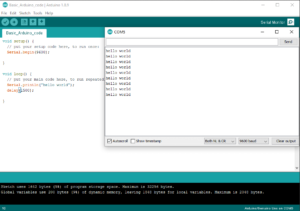
Basic code that print hello world to the serial monitor:
void setup() {
// put your setup code here, to run once:
Serial.begin(9600);

}

void loop() {
// put your main code here, to run repeatedly:
Serial.println("hello world");
delay(1500);

}
Serial.begin(9600);
I have figured out that this is the communication speed the Arduino and the device in bits.Sets the data rate in bits per second (baud) for serial data transmission.
Serial.println("hello world");
Prints data to the serial port as human-readable ASCII text. This command can take many forms. Numbers are printed using an ASCII character for each digit. Floats are similarly printed as ASCII digits, defaulting to two decimal places. Bytes are sent as a single character. Characters and strings are sent as is. For example-
-
Serial.print(78)gives “78” -
Serial.print(1.23456)gives “1.23” -
Serial.print("Hello world.")gives “Hello world.”
delay(1500);
Pauses the program for the amount of time (in milliseconds) specified as parameter. (There are 1000 milliseconds in a second.)
Other delay function is:
Leave a Comment
(0 Comments)