How to Use a Buzzer – Arduino Tutorial

In this tutorial you will learn how to use a buzzer or piezo speaker with Arduino. Buzzers can be found in alarm devices, computers, timers and confirmation of user input such as a mouse click or keystroke.
You will also learn how to use tone() and noTone() function.
Components :
- Arduino Uno
- Breadboard
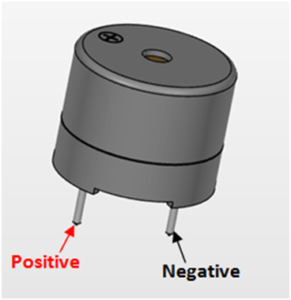
- Buzzer
- Connecting wares
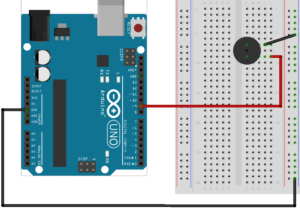
Connections:
Example Code:
const int buzzer = 9; //buzzer to arduino pin 9

void setup(){
  pinMode(buzzer, OUTPUT); // Set buzzer - pin 9 as an output
}

void loop(){

  tone(buzzer, 1000); // Send 1KHz sound signal...
  delay(1000); // ...for 1 sec
  noTone(buzzer); // Stop sound...
  delay(1000); // ...for 1sec

}
tone(buzzer, 1000);
Generates a square wave of the specified frequency (and 50% duty cycle) on a pin. A duration can be specified, otherwise the wave continues until a call to noTone(). The pin can be connected to a piezo buzzer or other speaker to play tones.
Only one tone can be generated at a time. If a tone is already playing on a different pin, the call to tone() will have no effect. If the tone is playing on the same pin, the call will set its frequency.
Use of the tone() function will interfere with PWM output on pins 3 and 11 (on boards other than the Mega).
It is not possible to generate tones lower than 31Hz. For technical details,
Syntax
tone(pin, frequency)
tone(pin, frequency, duration)
Parameters
pin: the Arduino pin on which to generate the tone.
frequency: the frequency of the tone in hertz. Allowed data types: unsigned int.
duration: the duration of the tone in milliseconds (optional). Allowed data types: unsigned long.
noTone(buzzer);
Stops the generation of a square wave triggered by tone(). Has no effect if no tone is being generated.
Syntax
noTone(pin)
Parameters
pin: the Arduino pin on which to stop generating the tone.
Leave a Comment
(0 Comments)