How to Use a PIR Sensor – Arduino Tutorial

What is a PIR sensor?
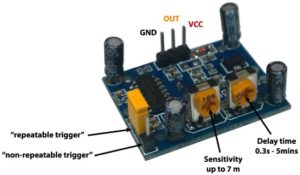
PIR or “Passive Infra-Red” sensor is a “Pyroelectric IR Sensor” which generates energy when exposed to heat. Everything emits some low level of radiation, the hotter the object is, the more radiation is emitted. When a human or an animal (with IR radiation wavelength of 9.4µMeter) approaches the sensors range the sensor detects the heat in the form of infrared radiation. The sensor only detects the energy emitted by other objects and don’t produce any, that’s why the sensor is called a PIR or “Passive Infra-Red” sensor. These sensors are small, cheap, rugged, low-power and very easy to use.
Components :
- Arduino
- HC-SR501 PIR Sensor
- Some connecting wire
Connections:
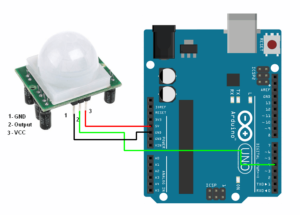
- GND – connect to ground
- OUT – connect to an Arduino digital pin
- 5V – connect to 5V
Example Code:
int sensor = 4;              // the pin that the sensor is atteched to
int state = LOW;             // by default, no motion detected
int val = 0;                 // variable to store the sensor status (value)

void setup() {
  pinMode(sensor, INPUT);    // initialize sensor as an input
  Serial.begin(9600);        // initialize serial
}

void loop(){
  val = digitalRead(sensor);   // read sensor value
  if (val == HIGH) {           // check if the sensor is HIGH
    delay(100);                // delay 100 milliseconds

    if (state == LOW) {
      Serial.println("Motion detected!");
      state = HIGH;       // update variable state to HIGH
    }
  }
  else {
      delay(200);             // delay 200 milliseconds

      if (state == HIGH){
        Serial.println("Motion stopped!");
        state = LOW;       // update variable state to LOW
    }
  }
}
Leave a Comment
(0 Comments)