How to Use an LCD Display – Arduino Tutorial
The LiquidCrystal library allows you to control LCD displays that are compatible with the Hitachi HD44780 driver. There are many of them out there, and you can usually find them by the 16-pin interface.
In this tutorial you will learn how to use LCD 16×2 display (and 20×4) with Arduino uno.
Components :

- Arduino uno
- Breadboard
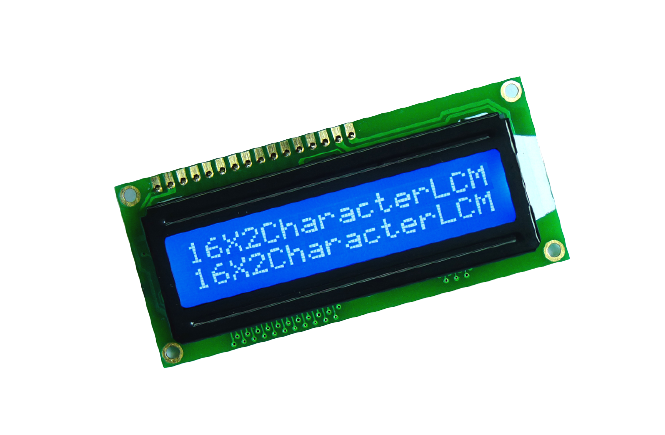
- LCD 16×2
- Potentiometer (e.g. 4.7K)
Connections:
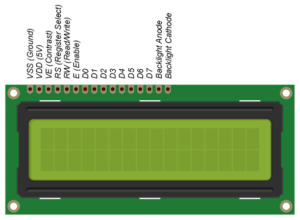
Here’s a diagram of the pins on the LCD I’m using. The connections from each pin to the Arduino will be the same, but your pins might be arranged differently on the LCD. Be sure to check the datasheet or look for labels on your particular LCD:
Also, you might need to solder a 16 pin header to your LCD before connecting it to a breadboard. Follow the diagram below to wire the LCD to your Arduino:
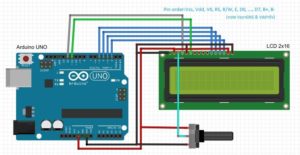
The connections are easy, see the image above with the breadboard circuit schematic.
Example Code:
All of the code below uses the LiquidCrystal library that comes pre-installed with the Arduino IDE. A library is a set of functions that can be easily added to a program in an abbreviated format.
In order to use a library, it needs be included in the program. Line 1 in the code below does this with the command #include <LiquidCrystal.h>. When you include a library in a program, all of the code in the library gets uploaded to the Ardunio along with the code for your program.
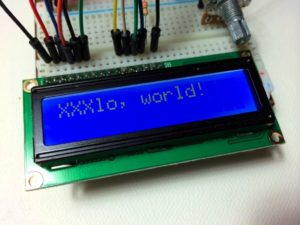
Now we’re ready to get into the programming! I’ll go over more interesting things you can do in a moment, but for now lets just run a simple test program. This program will print “hello, world!” to the screen. Enter this code into the Arduino IDE and upload it to the board:
#include<LiquidCrystal.h>
LiquidCrystal lcd(12,11,5,4,3,2);//12-RS,11-En,5,4,3,2-Display

void setup() {
    lcd.begin(16,2);//16-no. of col. , 2-no. of row
    lcd.print("hello, world!");
}

void loop() {
    lcd.setCursor(0,1);// 0-col, 1-row
}
Your LCD screen should look like this:

LCD Display options:
- LiquidCrystal()
- lcd.begin()
- lcd.clear()
- lcd.home()
- lcd.setCursor()
- lcd.write()
- lcd.print()
- lcd.cursor()
- lcd.blink()
- lcd.display()
- lcd.scrollDisplayLeft()
- lcd.scrollDisplayRight()
- lcd.autoscroll()
- lcd.noAutoscroll()
- lcd.rightToLeft()
- lcd.createChar()
There are 19 different functions in the LiquidCrystal library available for us to use. These functions do things like change the position of the text, move text across the screen, or make the display turn on or off. What follows is a short description of each function, and how to use it in a program.
LiquidCrystal()
The LiquidCrystal() function sets the pins the Arduino uses to connect to the LCD. You can use any of the Arduino’s digital pins to control the LCD. Just put the Arduino pin numbers inside the parentheses in this order: LiquidCrystal(RS, E, D4, D5, D6, D7). RS, E, D4, D5, D6, D7 are the LCD pins.
For example, say you want LCD pin D7 to connect to Arduino pin 12. Just put “12” in place of D7 in the function like this: LiquidCrystal(RS, E, D4, D5, D6, 12). This function needs to be placed before the void setup() section of the program.
lcd.begin()
This function sets the dimensions of the LCD. It needs to be placed before any other LiquidCrystal function in the void setup() section of the program. The number of rows and columns are specified as lcd.begin(columns, rows). For a 16×2 LCD, you would use lcd.begin(16, 2), and for a 20×4 LCD you would use lcd.begin(20, 4).
lcd.clear()
This function clears any text or data already displayed on the LCD. If you use lcd.clear() with lcd.print()and the delay() function in the void loop() section, you can make a simple blinking text program:
#include <LiquidCrystal.h>

LiquidCrystal lcd(12, 11, 5, 4, 3, 2);

void setup() {
    lcd.begin(16, 2);
}

void loop() {
    lcd.print("hello, world!");
    delay(500);
    lcd.clear();
    delay(500);
}
lcd.home()
This function places the cursor in the upper left hand corner of the screen, and prints any subsequent text from that position. For example, this code replaces the first three letters of “hello world!” with X’s:
#include <LiquidCrystal.h>

LiquidCrystal lcd(12, 11, 5, 4, 3, 2);

void setup() {
    lcd.begin(16, 2);
    lcd.print("hello, world!");
}

void loop() {
    lcd.home();
    lcd.print("XXX");
}
lcd.setCursor()
Similar, but more useful than lcd.home() is lcd.setCursor(). This function places the cursor (and any printed text) at any position on the screen. It can be used in the void setup() or void loop() section of your program.
The cursor position is defined with lcd.setCursor(column, row). The column and row coordinates start from zero (0-15 and 0-1 respectively). For example, using lcd.setCursor(2, 1) in the void setup() section of the “hello, world!” program above prints “hello, world!” to the lower line and shifts it to the right two spaces:
#include <LiquidCrystal.h>

LiquidCrystal lcd(12, 11, 5, 4, 3, 2);

void setup() {
    lcd.begin(16, 2);
    lcd.print("hello, world!");
}

void loop() {
    lcd.setCursor(2, 1);

}

lcd.write()
You can use this function to write different types of data to the LCD, for example the reading from a temperature sensor, or the coordinates from a GPS module. You can also use it to print custom characters that you create yourself (more on this below). Use lcd.write() in the void setup() or void loop() section of your program.
lcd.print()
This function is used to print text to the LCD. It can be used in the void setup() section or the void loop()section of the program.
To print letters and words, place quotation marks (” “) around the text. For example, to print hello, world!, use lcd.print(“hello, world!”).
To print numbers, no quotation marks are necessary. For example, to print 123456789, use lcd.print(123456789).
lcd.print() can print numbers in decimal, binary, hexadecimal, and octal bases. For example:
- lcd.print(100, DEC) prints “100”;
- lcd.print(100, BIN) prints “1100100”
- lcd.print(100, HEX) prints “64”
- lcd.print(100, OCT) prints “144”
lcd.cursor()
This function creates a visible cursor. The cursor is a horizontal line placed below the next character to be printed to the LCD.
The function lcd.noCursor() turns the cursor off. lcd.cursor() and lcd.noCursor() can be used together in the void loop() section to make a blinking cursor similar to what you see in many text input fields:
#include <LiquidCrystal.h>

LiquidCrystal lcd(12, 11, 5, 4, 3, 2);

void setup() {
    lcd.begin(16, 2);
    lcd.print("hello, world!");
}

void loop() {
    lcd.cursor();
    delay(1000);
    lcd.noCursor();
    delay(1000);
}
This places a blinking cursor after the exclamation point in “hello, world!”
Cursors can be placed anywhere on the screen with the lcd.setCursor() function. This code places a blinking cursor directly below the exclamation point in “hello, world!”:
#include <LiquidCrystal.h>

LiquidCrystal lcd(12, 11, 5, 4, 3, 2);

void setup() {
    lcd.begin(16, 2);
    lcd.print("hello, world!");
}

void loop() {
    lcd.setCursor(12, 1);
    lcd.cursor();
    delay(1000);
    lcd.setCursor(12, 1);
    lcd.noCursor();
    delay(1000);
}
lcd.blink()
This function creates a block style cursor that blinks on and off at approximately 500 milliseconds per cycle. Use it in the void loop() section. The function lcd.noBlink() disables the blinking block cursor.
lcd.display()
This function turns on any text or cursors that have been printed to the LCD screen. The function lcd.noDisplay() turns off any text or cursors printed to the LCD, without clearing it from the LCD’s memory.
These two functions can be used together in the void loop() section to create a blinking text effect. This code will make the “hello, world!” text blink on and off:
#include <LiquidCrystal.h>

LiquidCrystal lcd(12, 11, 5, 4, 3, 2);

void setup() {
    lcd.begin(16, 2);
    lcd.print("hello, world!");
}

void loop() {
    lcd.display();
    delay(1000);
    lcd.noDisplay();
    delay(1000);
}
lcd.scrollDisplayLeft()
This function takes anything printed to the LCD and moves it to the left. It should be used in the void loop()section with a delay command following it. The function will move the text 40 spaces to the left before it loops back to the first character. This code moves the “hello, world!” text to the left, at a rate of one second per character:
#include <LiquidCrystal.h>

LiquidCrystal lcd(12, 11, 5, 4, 3, 2);

void setup() {
    lcd.begin(16, 2);
    lcd.print("hello, world!");
}

void loop() {
    lcd.scrollDisplayLeft();
    delay(1000);
}
Text strings longer than 40 spaces will be printed to line 1 after the 40th position, while the start of the string will continue printing to line 0.
lcd.scrollDisplayRight()
This function behaves like lcd.scrollDisplayLeft(), but moves the text to the right.
lcd.autoscroll()
This function takes a string of text and scrolls it from right to left in increments of the character count of the string. For example, if you have a string of text that is 3 characters long, it will shift the text 3 spaces to the left with each step:
#include <LiquidCrystal.h>

LiquidCrystal lcd(12, 11, 5, 4, 3, 2);

void setup() {
    lcd.begin(16, 2);
}

void loop() {
    lcd.setCursor(0, 0);
    lcd.autoscroll();
    lcd.print("ABC");
    delay(1000);
}
Like the lcd.scrollDisplay() functions, the text can be up to 40 characters in length before repeating. At first glance, this function seems less useful than the lcd.scrollDisplay() functions, but it can be very useful for creating animations with custom characters.
lcd.noAutoscroll()
lcd.noAutoscroll() turns the lcd.autoscroll() function off. Use this function before or after lcd.autoscroll() in the void loop() section to create sequences of scrolling text or animations.
lcd.rightToLeft()
This function sets the direction that text is printed to the screen. The default mode is from left to right using the command lcd.leftToRight(), but you may find some cases where it’s useful to output text in the reverse direction:
#include <LiquidCrystal.h>

LiquidCrystal lcd(12, 11, 5, 4, 3, 2);

void setup() {
    lcd.begin(16, 2);
    lcd.setCursor(12, 0);
    lcd.rightToLeft();
    lcd.print("hello, world!");
}

void loop() {

}
This code prints the “hello, world!” text as “!dlrow ,olleh”. Unless you specify the placement of the cursor with lcd.setCursor(), the text will print from the (0, 1) position and only the first character of the string will be visible.

lcd.createChar()
This command allows you to create your own custom characters. Each character of a 16×2 LCD has a 5 pixel width and an 8 pixel height. Up to 8 different custom characters can be defined in a single program. To design your own characters, you’ll need to make a binary matrix of your custom character from an LCD character generator or map it yourself. This code creates a degree symbol (°):
#include <LiquidCrystal.h>

LiquidCrystal lcd(12, 11, 5, 4, 3, 2);
byte customChar[8] = {
    0b00110,
    0b01001,
    0b01001,
    0b00110,
    0b00000,
    0b00000,
    0b00000,
    0b00000
};

void setup()
{
    lcd.createChar(0, customChar);
    lcd.begin(16, 2);
    lcd.write((uint8_t)0);
}

void loop() {
}

There are a lot of cool things you can make happen with these 16×2 LCDs! Try combining some of these functions and see what happens.
Reference : www.circuitbasics.com
Reference : www.instructables.com
Leave a Comment
(0 Comments)